Quickstart
This page gives a good introduction to how to get started with Glances. Glances offers multiple modes:
Standalone (TUI)
Server (REST API and Web UI) / Client
Fetch
Standalone Mode
If you want to monitor your local machine, open a console/terminal and simply run:
$ glances
Glances should start (press ‘q’ or ‘ESC’ to exit):

It is also possible to display RAW (Python) stats directly to stdout using:
$ glances --stdout cpu.user,mem.used,load,network.wlp2s0.bytes_recv
cpu.user: 25.0
mem.used: 954605568
load: {'min1': 2.09, 'min5': 1.01, 'min15': 0.72, 'cpucore': 4}
network.wlp2s0.bytes_recv: 13479
cpu.user: 42.6
mem.used: 1033232384
load: {'min1': 2.24, 'min5': 1.06, 'min15': 0.74, 'cpucore': 4}
network.wlp2s0.bytes_recv: 12868
...
or in a CSV format thanks to the stdout-csv option (key not supported in this mode):
$ glances --stdout-csv now,cpu.user,mem.used,load
now.iso,now.custom,cpu.user,mem.used,load.min1,load.min5,load.min15,load.cpucore
2026-10-11T15:12:05+00:00,2026-10-11 15:12:05 UTC,47.4,1062043648,2.22,1.08,0.74,4
...
or as a JSON format thanks to the stdout-json option (attribute not supported in this mode):
$ glances --stdout-json cpu,load
{"cpu": {"user": 50.0, "system": 6.3, "idle": 43.7, "nice": 0.0, "iowait": 0.0, "irq": 0.0, "steal": 0.0, "guest": 0.0, "total": 56.3, "cpucore": 4, ...}, "load": {"min1": 2.22, "min5": 1.08, "min15": 0.74, "cpucore": 4}}
...
Note: --stdout displays one line per stat per refresh, --stdout-json
one JSON object per refresh and --stdout-csv one line per refresh.
Use --stop-after <n> to stop after n refreshes.
Server Mode (REST API and Web UI)

If you want to remotely monitor a machine called server, from any
device with a web browser, just run the server with the -s option
(-w is the same mode, kept from Glances v4):
server$ glances -s -B 0.0.0.0
then, on the client, enter the following URL in your favorite web browser:
http://@server:61208
where @server is the IP address or hostname of the server.
The server runs headless (no TUI). It serves the RESTful API on /api/5
(see Restful/JSON API documentation) and the Web UI on /. Use --disable-webui
to only serve the API.
The default bind address is 127.0.0.1: the server only answers on the
local machine. Use -B ADDRESS (or bind_address in the [outputs]
section of the configuration file) to listen on another interface,
0.0.0.0 for all the IPv4 interfaces. The default TCP port is 61208,
it can be changed with -p PORT (or port in [outputs]).
To change the refresh rate of the page, add the period in seconds
to the URL. For example, to refresh the page every 10
seconds:
http://@server:61208/?refresh=10
The Glances web interface follows responsive web design principles.
Here’s a screenshot from Chrome on Android:

Security — DNS rebinding protection
A server bound to a loopback address (the default 127.0.0.1) only
accepts requests whose HTTP Host header is localhost, 127.0.0.1
or [::1]. A server bound to another address applies no Host
filtering and logs a warning at startup.
Set the accepted Host values with webui_allowed_hosts in the
[outputs] section of glances.conf, for example behind a reverse
proxy that forwards its own Host or for any deployment on a
non-loopback interface:
[outputs]
webui_allowed_hosts=localhost,127.0.0.1,myserver.example.com
Requests whose Host header does not match any of the listed patterns
are rejected with 400 Bad Request. Wildcards are supported, for example
*.example.com.
Client Mode
You can also display the stats of a remote Glances server in your terminal.
Run the server as described above (glances -s -B 0.0.0.0) and, on the
client:
client$ glances -c @server
where @server is the IP address or hostname of the server. It is also
possible to give @server:port or an http(s):// URL (for a server
behind a TLS reverse proxy).
In client mode, you can set the TCP port of the server with -p PORT.
The client only speaks to a Glances v5 server (REST API /api/5); the
Glances v4 XML-RPC server is not supported anymore.
In client/server mode, limits are set by the server side.
Central Glances Browser

Glances can centralize available Glances servers using the --browser
option. The server list can be statically defined via the configuration
file (section [serverlist]).
Example:
[serverlist]
# Define columns (comma separated list of <plugin>:<field>:(<key>)) to grab/display
# Default is: system:hr_name,load:min5,cpu:total,mem:percent
# You can also add stats with key, like sensors:value:Ambient
columns=system:hr_name,load:min5,cpu:total,mem:percent,memswap:percent
# Define the static servers list (the port defaults to 61208)
server_1_name=xps
server_1_alias=xps
server_1_port=61208
server_2_name=win
server_2_port=61235
# The name can also be an http(s):// URL
server_3_name=https://glances.example.com
Glances can also detect and display all Glances v5 servers available on
your network via the zeroconf protocol (browser extra needed):
To start the TUI Central Glances Browser, use the following option:
client$ glances --browser
When the list is displayed, you can navigate through the Glances servers with up/down keys and open one with ENTER. It is also possible to sort the server using:
‘1’ is normal (do not sort)
‘2’ is using sorting by status (UNKNOWN > OFFLINE > PROTECTED > UNSUPPORTED > ONLINE)
‘3’ is using sorting by status in reverse order (ONLINE > UNSUPPORTED > PROTECTED > OFFLINE > UNKNOWN)
UNSUPPORTED means that something answers on the port, but not the Glances
v5 API (a Glances v4 server, for example).
A server discovered on the network is listed as <name> (zeroconf <address>)
and opened at that address: anyone on the network can announce under any name,
so check the address before typing a password (it is sent over clear HTTP).
An announcement that uses the name or alias of a [serverlist] server is
ignored.
To start the WebUI Central Glances Browser, use the following option:
client$ glances --browser -s
Open the URL (/browser) and click on the server to display stats. The
servers list is also available on the /api/5/serverslist endpoint.
Note
Use --disable-autodiscover to disable the auto-discovery mode.
IPv6
Glances is IPv6 compatible. Just use the -B :: option to bind to
all IPv6 addresses.
How do you protect your server with a login/password ?
Generate a password hash with the --set-password option:
$ glances --set-password
Password:
Confirm:

Paste this value into [outputs] password of your glances.conf:

<salt>$<hash>
and paste it in the [outputs] section of the Glances configuration file
(~/.config/glances/glances.conf on GNU Linux operating system).
By default, the login is glances but you can change it with the
username key:
[outputs]
password=<salt>$<hash>
# Optional, default is glances
#username=glances
The REST API and the Web UI then require this login/password (HTTP Basic
authentication or a JWT bearer token from /api/5/token).
On the client side, use -u <username> to set the login and
--password to be prompted for the server’s password. It is also
possible to set the client passwords in the Glances configuration file:
[passwords]
# Define the passwords list
# Syntax: host=password
# Where: host is the hostname
#        password is the clear password
# Additionally (and optionally) a default password could be defined
localhost=mylocalhostpassword
default=mydefaultpassword
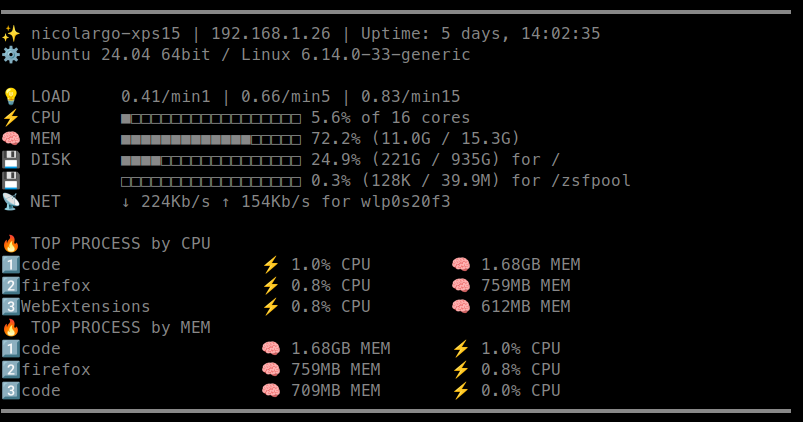
Fetch mode
It is also possible to get and share a quick look of a machine using the
fetch mode. In this mode, current stats are display on the console in
a fancy way.
$ glances --fetch
Results look like this:
It is also possible to use a custom template with the --fetch --fetch-template </path/to/template.jinja> options.
Have a look to the fetch documentation page to learn how to create your own template.